Since this is possibly the final weekend before world politics devolve into a Third World War what better time to highlight a pursuit that, perhaps more than any other, values strategic thought, deep calculation, psychology, and prudence. Sadly I am most definitely not talking about 21st Century diplomacy… but rather the game of Chess.
Although come to think of it, maybe Chess could be the answer to this current crisis? The howtoWASP believes that war, and especially unnecessary war, is exceedingly detrimental to Western Civilization (and therefore WASP culture) and should be avoided if at all possible.
Rather than fight things out over the cities of Europe and Asia, why not settle this dispute on the chessboard instead? How entertaining would it be to have President Obama challenge President Putin to a winner take all (or just the Crimea) game of Chess? The broadcast rights alone would probably be enough to pay down a significant portion of the national debt.
Then again perhaps challenging a Russian to a game of Chess isn’t the wisest thing in the world? It would be a bit like challenging a Norwegian in skiing, or an Irishman to drinking, or like the French challenging anyone else to an actual war… Probably not a good idea. But enough with the politics and back to the matter at hand, Chess!

Chess is kind of a strange topic because it straddles the line between the worlds of WASP culture and nerd culture. In terms of historic pedigree, Chess has a lot going for it. It was popular among the British, it’s seen as a noble intellectual pursuit, and often evokes images of civilized competition among students at a prep school or members of a social club.
Then again, over the past half century or so, Chess has definitely struggled with a reputation of being the preferred hobby of the kid you probably didn’t want to hang out with in school.

Thankfully, that has been changing of late and Chess is becoming cool again. Want proof? Google the name of the current world champion, Magnus Carlsen, and you won’t see the stereotypical Chess nerd, but rather someone who would look perfectly at home selling Abercrombie & Fitch clothing at the mall.
So, with the social stigma disappearing, and the WASP cred as strong as ever, Chess is definitely something worth learning.
The History:
If you’re looking for historical pedigree, Chess is difficult to beat. It is one of the oldest games on the planet, having been played in some form or another for neartly 2,000 years. There is still debate over the earliest origins of the game, but credit is generally given to the Indians (the Asian variety) who played a game called Chaturanga as early as 300 A.D. Chaturanga was played on an 8×8 grid and featured different pieces that each had special attributes, more or less analogous to the modern Chess pieces of today.
By the 7th Century, Chaturanga had found its way to the Persian empire where it continued to gain in popularity and spread throughout the world. Around the 9th Century the pastime began to pop up in Europe as well, most prominently among the Moors who introduced it into the Iberian Peninsula and what is modern day Spain. It was during this time that the game, which had picked up the name “Shah” (Persian for “king”) began to be known as Chess.

In the hundreds of years that followed, Chess spread quickly throughout Europe where it continued to evolve. During the 15th Century the modern rules for the game were adopted by the Spanish and Italians. With small tweaks here and there, the game as we know it today was finalized in 1850.
It was during this European evolution that the aura of Chess as a gentleman’s sport was cemented in place. Since the Middle Ages Chess has enjoyed a reputation as a noble pastime, where it was viewed as the game of choice for kings, knights, and other members of nobility. It’s popularity and esteem continued to grow with the great thinkers of the Renaissance and continued into the Age of Enlightenment. Benjamin Franklin himself went so far as to write an article praising Chess as a method of self improvement and for the virtues of strategy and thought it can instill in man.
In the Modern Age, since 1850, Chess experienced further explosions in popularity as rules for formal competition and rankings were set in place. However, the good times would not last. With the onset of the World Wars, and the Cold War that followed, much of the Western world lost interest in the game (it didn’t help that the Soviets dominated the wold competition during those years) and Chess settled into a new role as a niche hobby for those with more brains than braun.
But again, with the dawn of the the 21st Century, it appears those days might finally be behind us and Chess is poised to rise again.
The Game:

The best thing about Chess is that it follows the golden rule for great games: It’s simple to learn, but nearly impossible to master. It can be picked up quickly and played by just about anyone, yet subsequently provide a lifetime of challenge and enjoyment for those who seek to improve. Chess is also one of the few games where chance plays no role in the outcome. You win or lose based on your play alone and the winner is always going to be the player who commits the fewest errors.
If you’ve never played before, or if its been over a decade since your last game, then the only place to begin is with the fundamentals.
I won’t waste time reinventing the wheel here because there are plenty of great resources available where anyone can learn the basic rules of the game. My personal recommendation would be to check out Chess.com, which offers great lessons for everyone, from the rank beginner to the Grand Master. If you want to go the more formal route, there are plenty of books on the subject available for pennies on Amazon, or for free at your local library.
Once you know how the pieces move, you could theoretically begin playing immediately, just be prepared to lose, a LOT. While there’s no substitute for in-game experience, I would highly recommend devoting at least some further study to the three main components of the game and the strategy and tactics behind them. As a very brief overview, these include:

- The Opening: This covers the first 10 moves or so of the game. Basically both sides are seeking to establish position and control the center of the board as quickly as possible. Setting up a solid defense and protecting your king are also paramount. The good news here is that since Chess has been played for centuries, most openings are set to an established script. While there are only 18 possible opening moves (and really only about 5 that you’d ever want to use) there are hundreds of “book” openings to cover all the possible responses, re-responses, and so fourth that can follow. Again, Chess.com provides a wonderful library of book openings. Like anything else, all it takes is study and experience to recognize and play them.
- The Middle Game: This is where most of the action occurs. The fight for position continues, but more pressing is the need to set up an effective attack, or defense to counter an opponent’s attack. Most of the time the goal in the middle game is to force exchanges (trading pieces) that leave you with a material (having a greater number of and/or more powerful pieces left on the board) or positional advantage. This phase requires much more thought and analysis than the opening as tactics begin to outweigh the strategic focus of the opening. Players must calculate several moves ahead, taking into account many different pieces and possible combinations, to be successful.
-
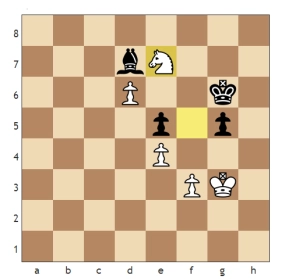
A typical End Game scenario: short on material, long on options. A tacticians paradise. The End Game: Assuming that you didn’t blunder the game away in the middle (which is definitely possible, especially as a beginner) then things proceed to the final phase, the end game. Here calculations become theoretically easier because there are often only a few pieces remaining (usually mostly pawns and kings), but it rarely seems that way in practice because of the sheer number of possible moves available on the open board. Here tactics are paramount as even a slight mistake can lead to a disadvantage and eventual loss. If you’re ahead or even at this point, you’re playing for the win. If you’re down, then playing for a draw(tie) is probably your best bet.

Of course that’s a gross over-simplification of the game, but those are the basics. As I said, the only way to truly learn and get better is to sit down and play as much as possible (which thankfully is much easier in the internet age). Fair warning, it will probably take about 6 months of regular play before you start to really understand and win games on a consistent basis, but once you reach that point, you will have developed a new skill for life.
So what are you waiting for? In this crazy world, where attention spans increasingly need to be measured on a nano scale, and shows like Teen Mom and Jersey Shore makes up a disturbing proportion of the entertainment content available, wouldn’t it be nice to slow down and give your brain a bit of proper intellectual (and supremely WASP’ish) stimulation?
As we know, Benjamin Franklin believed that Chess was an excellent resource for self improvement, and with that in mind, I will close with what I believe is the number one life lesson taught by Chess: No matter how well you prepare, or how far you’re ahead, we are all but one blunder away from complete and unmitigated disaster. Perhaps both Obama and Putin would do well to remember that…
Next Steps:
- Assuming you’ve learned the basics, the best thing you can do is get out and play some Chess. While in-person games are classic and always fun, the internet has opened up a whole new range of options. My favorite offering from Chess.com is the ability to play online, turn based games (typically up to 3 days per move) that allow you to play at your own leisure, against thousands of players of every skill level across the globe.
- When you play, try to play against opponents who are better than you. While it’s always enjoyable to win, if it’s against a lessor player, you’re probably not learning much in the process. The flip side is that while losing sucks, you can actually learn a lot if you pay attention. Remember, it takes about 6 months to really pick things up and become competitive. Don’t get discouraged!
-
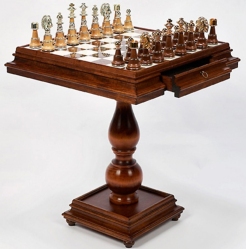
Nothing classes up the joint like a dedicated Chess table. Although all you really need is a good board and set. While online Chess is great, you’ll also want a good, old fashioned Chess set in your home. Why? First of all because it will make you look smart and sophisticated when guests come over. Second, it will allow you to play more games in person. And lastly it can be a valuable analysis tool to visualize and play out scenarios in your online games.

- Keep learning. While there’s no substitute for actual play, reading books and watching video lessons on advanced strategy and tactics can really help improve your game. This is obviously more beneficial for experienced players, but if you’re like me, once you catch the bug, it’s hard to stop.